Since the last post announcing that I was having to abandon the boat, I've found someone who wants to take the project over. I was in a bit of a quandary about what to do, as I really didn't want to have it thrown out.
I won't be blogging on this topic any more, unless, where I end up in my next position, I take on another boat restoration...
All the best,
Walter
Friday, June 25, 2010
Monday, June 14, 2010
Sad to report
Sad to report that I won't be able to finish this project. Anyone in NZ who wants to take up the gauntlet and finish restoring this boat can have it, and the kauri wood that I've prepared for use in its restoration.
It's in pretty delicate condition - you'll need to collect it and treat it with kid gloves while taking it to your workshop.
Please contact me through the comments section on this blog if you want it...
More later...
Walter
Saturday, May 8, 2010
Slowed to a crawl
(*&%*^$(*&_ bandsaw blade broke.
Grrrr.
Japanese draw-saw works fine and makes good straight, clean cuts, but it's not that nice for cutting long "rip" cuts. Bandsaw much faster.
*&^%(*& where to get it welded.
W
Grrrr.
Japanese draw-saw works fine and makes good straight, clean cuts, but it's not that nice for cutting long "rip" cuts. Bandsaw much faster.
*&^%(*& where to get it welded.
W
Monday, April 19, 2010
The patch
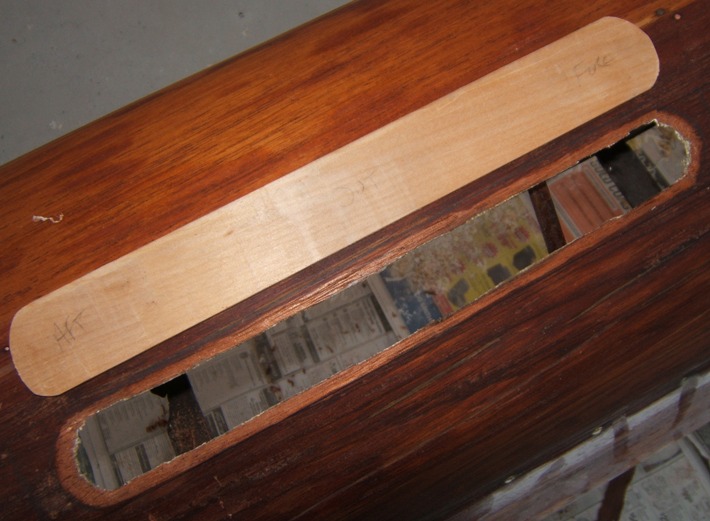
 Here's the patch after all the excess stuff was taken off. I'm not sure it's the best patch from a mechanical perspective. (ok, I know it's not) but it replaces a spot on the hull where a previous attempt at repair had sanded through, creating a hole. The hole was about 1/3 of the way in from the right edge of where the patch is now. As well as replacing that bit, the patch reclaims some (not all) of the normal curvature you'd expect to see in a hull - there were some flats and then too-sharp curves which have been somewhat normalised.
If I remember correctly from when Werner Kahl, (late boatbuilder from Stampfli) showed me some things when he was repairing a Vancouver RC Stampfli 4-, the next phase, before continuing with external work, is to get all the internal structures rebuilt. That's going to require some careful work getting it all to go together straight, so that when I re-fix the skin to the framing where it has come loose, the boat is in its proper lines..
W
Sunday, April 18, 2010
Some random work
Well, I'm not 100% sure how this blogger editor thing works but it's sure awkward putting photos in - they all seem to want to go to the top, and require moving about thereafter...
Bit frustrating. Anyway..
A few days ago I cut the patch shown in the photo below, and then cut out the damaged bits of the hull (a previous repair featured the hull being sanded through to nothing, then coated with fabric inside and out, with a part of the hull warped quite badly). Took that home intending to bend it to approximate the curve of the hull, so it would be easier to fit in. That failed when the patch split. So, I've cut a new patch (not the one in this photo) done a bit of carving and sanding, and glued it in place. Using a "gap-filling polyurethane glue" for this one, so it's gloves, masking, and some hopes...
 This photo shows the patch from the inside, with the expansion of the poly-glue. The stick you see on the right is pushing outwards on the skin, (held on the other side by the boat-tie-strap that's pulling the stick against the skin) with the intent of keeping the hull shape a little better. Ugly.
 This photo shows the patch being held in place from the outside. There are strips of wood holding the edges of the patch down, and good old black tape being used as a "glue clamp" The area around the patch has been masked off with a bit of plastic to keep the glue from getting too far.
Next phase is going to be to get the patch and the hull to be smooth at the edges and "fitting" the hull shape. The glue should be cured by the time I get back to it - possibly later today.
 After glueing and taping the patch in place, while waiting to see if the glue would do its desired thing, a start was made on cutting the Kauri crossmembers for the stern. Numbered 1-9 from stern to cockpit, most of the old ones were there in one form or another. Where possible I used the old ones as templates. #4 had to be estimated. Eventually, they'll all have a notch cut top-centre for the deck-stringer, and they'll be carved/sanded to better shapes. For now, though, I wanted to get the sizes cut and see if they fit. The big cut-out in #9 is needed to fit over the central keel brace.
Nuf said for now. Dentist appointment calls.
Bit frustrating. Anyway..
A few days ago I cut the patch shown in the photo below, and then cut out the damaged bits of the hull (a previous repair
 featured the hull being sanded through to nothing, then coated with fabric inside and out, with a part of the hull warped quite badly). Took that home intending to bend it to approximate the curve of the hull, so it would be easier to fit in. That failed when the patch split. So, I've cut a new patch (not the one in this photo) done a bit of carving and sanding, and glued it in place. Using a "gap-filling polyurethane glue" for this one, so it's gloves, masking, and some hopes...
 This photo shows the patch from the inside, with the expansion of the poly-glue. The stick you see on the right is pushing outwards on the skin, (held on the other side by the boat-tie-strap that's pulling the stick against the skin) with the intent of keeping the hull shape a little better. Ugly.
 This photo shows the patch being held in place from the outside. There are strips of wood holding the edges of the patch down, and good old black tape being used as a "glue clamp" The area around the patch has been masked off with a bit of plastic to keep the glue from getting too far.
Next phase is going to be to get the patch and the hull to be smooth at the edges and "fitting" the hull shape. The glue should be cured by the time I get back to it - possibly later today.
 After glueing and taping the patch in place, while waiting to see if the glue would do its desired thing, a start was made on cutting the Kauri crossmembers for the stern. Numbered 1-9 from stern to cockpit, most of the old ones were there in one form or another. Where possible I used the old ones as templates. #4 had to be estimated. Eventually, they'll all have a notch cut top-centre for the deck-stringer, and they'll be carved/sanded to better shapes. For now, though, I wanted to get the sizes cut and see if they fit. The big cut-out in #9 is needed to fit over the central keel brace.
 Nuf said for now. Dentist appointment calls.
Thursday, April 15, 2010
Oil

Here's hoping that Raw Linseed Oil is the right stuff. In the hope that it would remedy some of the dryness and brittleness of the aged wooden hull and interior bits of wood, I've taken a 2:1 mix of raw linseed oil and mineral turpentine, and given the whole boat a coating. Inside and out. It masks some flaws, brings out others, and returns some of the dark lustre of the wood from its weathered and ?rotting? condition. Seemed to soak in really well.
Bandsaw and glue go out to the boatshed soon. When the interior of the boat has been re-constructed a little, I'll return to taking off all the really cruddy finish from outside.
Autumn is hitting New Zealand - we had torrential rainfall at 4:30 this morning and while it's sunny today, it sure isn't warm. All the deciduous trees are well into their fall colours.
Wednesday, April 14, 2010
Patience
An e-mail from a friend reminded me of a conversation I had many moons ago, with Frank Cunningham. If I remember correctly, Frank was boatman at U of Washington (Seattle) into the 1980s.
Cunningham: "The most important tool in your workshop is patience."
That might be a quote, or it might be a paraphrase, but it's true. It's true for a coach developing young athletes, too.
W
Monday, April 12, 2010
Progress!!!
It's true.
The last few days have seen an hour here, an hour there, and some success getting the varnish off the hull with a chemical paint stripper.
I think at this point it may be time to make a wooden patch for the hull: Plane down a bit of Kauri to match hull thickness, make a patch with a long taper to the edges, shape the hole to fit the patch, bend the patch a wee bit to match the curvature of the hull, and glue it in..
Before proceeding on much more of the outer hull, it may be beneficial to start glueing bits and pieces back together inside the boat, truing it to a string line whilst doing that, and giving it a bit more strength. With the skin coming away from the framework in a bunch of places, and with the internal supports (deck stringer, cross braces, diagonal braces) all removed, the boat's pretty floppy.
Time to take the little hobby bandsaw out to the boatshed.
Thursday, April 8, 2010
More Dust
Oh dear...
The good thing about an angle grinder with a paint-stripping tool is that it chews through old finish in a hurry and turns it into dust.
The bad thing about an angle grinder with a paint-stripping tool is that it chews through old finish in a hurry and then if you're not careful - VERY careful, it turns bits of the hull into dust, too...
I'm trying to get through the resin and cloth to the point where there's still a bit of resin/varnish/finish between me and the wood. It is do-able, but it is also very easy to go a bit too far. I'm not that worried because the boat will be getting a (very thin) reinforcement of glass cloth after all this finish is off and some of the internal work has been repaired.
 The first picture here shows some of the nearly chewed through fabric in a patch in the upper right quadrant - sort of a whitish area - and the bits on the other side of the keel (foreground) where I've very nearly gone a bit too deep.
Right now the thing is SO dry that the skin is quite brittle.
For a bit of a change of scene (and to not run a power tool for a while) I've turned the boat over and started sanding the white primer off the framework. I'm not sure why anyone would put white primer on what was once a lovely wooden boat, but there's not much accounting for taste. Purists, of course, will take me to task for using the grinder but while this is a labour of love, there's only so much love to go around and this part of the boat is a wrinked mess, with a thick layer of fibreglass inside the hull, too.
 Here you can see the boat interior dismantled farther than the last photos from January. I tried to take some shots showing where the skin had come free of the frame but the good old digital camera had used up its battery - next time.
Bought some chemical paint-varnish stripper - I'm pretty sure that's what's on the outside of the rest of the hull - and I'm very much hoping it isn't the resin used to hold that fabric on..
Til next time - it's late...
Monday, April 5, 2010
Solutions to bad repairs
The boat got some pretty nasty treatment today. Yesterday I found out that the hook-loop/velcro sanding disks don't work all that well under heavy usage, and that a scraping tool and elbow grease work well, but it's tedious and hard on the hands to get through a millimeter of whatever resin was used and whatever fabric was used. So I was looking for some solutions that would work better.
Paint stripping wheel on an angle grinder. (I can hear people shudder.) It's very rough, but it cuts through the gunk on the boat quite quickly. One needs to be very judicious with pressure on the hull, because even a moment of cutting after the resin is out of the way will eat right through the wood. Fortunately I was able to get almost all of the cloth and resin off, exposing the wood in places, but not gouging. The more careful removal of the un-reinforced finish comes next - Will try some furniture stripper first, and see what that does..
Sanding off the white primer from the inside bits of the boat is also going to be a chore. Why anyone would put that crap on a wooden boat is beyond me, but...
That was another (approximately) 100 minutes of work on the boat today. Cleaning the resin and fabric off a section of hull about 1.5 m long (between the foot-stretchers and the start of the splash-vee) provided about 1 litre of dust and shavings.
Til the next time. Must take the camera to the boatshed one of these times....
Sunday, April 4, 2010
Back to work
Was it that long ago?
Today (Easter Monday in NZ) I had a go at taking off some of the finish on the outside. A previous owner globbed on some fabric (I don't think it's fibreglass). Bought a Ryobi random orbital sander with the hook-loop paper. Not recommended for this sort of a job. The stuff does cut through the fabric and resin (there's perhaps 1 to 1.5 mm of the stuff on the hull, so it takes some work to get through it). After about 15 minutes running on high speed, though, the bed on the back of the sandpaper degrades and won't hold to the hooks on the sander any more - so that's not a suitable option for getting the finish off.
Tried the old "busted hacksaw blade shop-knife-scraper" tool - an old industrial hacksaw blade with some sharp square corners ground onto the side opposite the teeth (after grinding off the teeth). Works a treat - peels through the finish much faster than even 40 grit sanding disks on the Ryobi.
Spent about 75 minutes on the boat today - This is (as anticipated) going to take a while. Must get a more substantial chunk of steel to make into a scraper so I can use both hands in a full grip - the one I have now is a little short, and it's hard on the old thumbs...
Good to be started back at the boat...
Sunday, January 24, 2010
Further Deconstruction
Saturday, between rowing sessions, the diagonal braces, deck stringers, and transverse braces (not sure what the wood boat builders call them) came out - they're numbered on the floor at the boat shed.
No photos at present, but the boat's pretty floppy with no internal bracing and the skin pulled away from the gunwales in many places.
After the Maadi Cup regatta (22-28 March - busy as right now), there will be more time to work on this boat.
Walter
No photos at present, but the boat's pretty floppy with no internal bracing and the skin pulled away from the gunwales in many places.
After the Maadi Cup regatta (22-28 March - busy as right now), there will be more time to work on this boat.
Walter
Friday, January 1, 2010
Starting off
2 January, 2010
At last year's NZSSRA Championship (a.k.a. the Maadi Cup regatta), Howard Croker told me about a book - Rowable Classics: Wooden Single Sculling Boats & Oars, by Darryl J. Strikler, published by Wooden Boat Books, Maine, USA, 2008. Howard recommended the book partly because he knows a little about my interests, and partly because he said that the segment on his oars was accurate. The book got me thinking about getting my hands on an old wooden single and getting it under my backside, on the water. So, I started asking and looking around.
There was a bit of a job upheaval, and I've ended up at St. Andrew's College, Christchurch, as their Director of Rowing. Up in the rafters at the Avon RC boatshed was an old wooden single, of which the ownership was uncertain. (Until about 3 days ago we kept our equipment at the main Avon building. We've now moved into our new boat bay, an addition to the Canterbury Rowing Association's boatshed - still part of Avon, but now all under our control.) After a couple of months of asking around, the ownership of the boat was established - essentially Avon seized the boat for non-payment of 10 years' boat storage fees, and "sold" it to me for the price of a bottle of Pinot Noir. So I bought a fairly good bottle, and the trade was made.
On starting the project, I blabbed about it on rec.sport.rowing, a usenet newsgroup that I access through Google Groups; a Canadian fellow now living in the Excited States e-mailed to suggest that I blog about the rebuilding process, along with some photos.
So here we are. A rather beat up old single. I'd done quite a bit of the initial dismantling prior to getting the blog bug, so I can't show you the original condition of the boat with the really crappy blue plastic decking. Eventually this will have a tightly stretched fabric deck held in place the old way - stretched and nailed in place with a half-round bead of Kauri..

The boat is of unknown (to me) manufacture, and it's had at least a few repairs by someone who didn't appear to care what sort of cosmetic results they got. I suspect it was at one time taken to a regatta tied to a trailer by people who had only previous experience with composite boats, because the internal bits and pieces (deck stringer, cross struts) are in pretty rotten shape, most likely from being crushed against a rack on a trailer. You can see the crossmembers and thwarts seem to be painted with a white primer of some kind, instead of a marine varnish.
In this photo, you can see a bit under the seat deck where a previous repair of a hole in the hull is a double layer of fibreglass (one inside, one outside): The horizontal line about halfway up the skin from the hole is a crack, also covered with glass - that you can see through. This is going to be a bit of a tough one if I want to do it "right".

The next bits and pieces in the project are to get the rest of the wooden ribs, diagonal braces, and deck stringers carefully out of the boat, (so they can be used as templates - the ones that aren't completely demolished, that is) sanding through some of the white primer and digging out the filler that's been glued all over the place. Then spreading a liberal dose of lemon oil all over the exposed wood, followed by a week to let the oil soak in. Convenient that there's a week-long training camp at Twizel coming up.
I've managed to find a chunk of Kauri from which to cut the replacement wooden bits and pieces. Kauri is now a protected tree in NZ - and any I'm going to be using is recovered from old buildings. The 45mm x 150 mm x 1.8 m chunk of Kauri should provide me with lots of parts with some to spare. I've done most of the big cutting at the St. Andrew's College Technology Centre (woodworking shop) and will do the rest with hand tools (an old veneer saw, for example).
A couple of more photos:

The bailing board - ugly...

And the bailer out of the boat - a pattern for a new one.
Til the next post...
Walter
Subscribe to:
Posts (Atom)